When your tent pole snaps miles from the trailhead or your backpack strap gives out mid‑trek, knowing practical camping gear repair tips can mean the difference between continuing your adventure and cutting it short. If you’re searching for reliable ways to fix, reinforce, or extend the life of your outdoor equipment, this guide is built specifically for you.
We focus on field-tested repair strategies that work in real wilderness conditions—not just quick fixes that fail after a few miles. From patching torn fabric and sealing leaks to restoring broken zippers and stabilizing damaged frames, you’ll find clear, actionable steps designed for hikers, campers, and backcountry explorers.
Our recommendations draw from hands-on outdoor experience, proven repair techniques, and practical survival strategies used in demanding environments. By the end of this article, you’ll know exactly how to handle common gear failures confidently, save money on replacements, and stay prepared for whatever the trail throws your way.
Miles from the trailhead, the wind howls, your tent rips, and your sleeping pad deflates into an icy sponge. Scenario A: panic, pack up, and trudge out miserable. Scenario B: pause, patch, and sleep dry. A single failure can end a dream trip—or become a solvable problem.
This guide shares field-tested fixes so you can:
- Seal tears with tape and tensioning.
- Patch punctures before heat loss sets in.
- Splint broken poles with spare stakes.
These camping gear repair tips build self-reliance, save replacement costs, and keep your adventure on track. Preparation turns crises into campfire stories later.
Your Pocket-Sized Workshop: Building the Ultimate Field Repair Kit
Out in the wild, your repair kit isn’t an accessory—it’s insurance. A well-curated kit can turn a potential trip-ender into a minor inconvenience (and a good story later). In other words, it’s the most important piece of gear you can carry.
First, adhesives. Duct tape is the universal fixer—boots, poles, torn packs, you name it. Tenacious Tape is designed for high-performance fabrics like tents and rain jackets, sticking where ordinary tape gives up. Seam Grip or Aquaseal creates permanent, waterproof repairs, ideal for waders or sleeping pads. Think of them as the Avengers of stickiness—each with a specialty.
Next, fasteners and cordage. Zip ties handle structural fixes fast. Safety pins rescue ripped clothing or busted straps. Spare buckles replace cracked ones, and a hank of paracord offers endless versatility, from guy lines to emergency belts. Pro tip: wrap duct tape around your water bottle to save space.
As for tools, carry a quality multi-tool with pliers and a knife, a sewing awl for thick materials, a heavy-duty needle, and strong thread—dental floss works brilliantly and is waterproof.
Finally, pack fabric-specific patches and a tent pole splint. These camping gear repair tips keep small failures from becoming epic sagas.
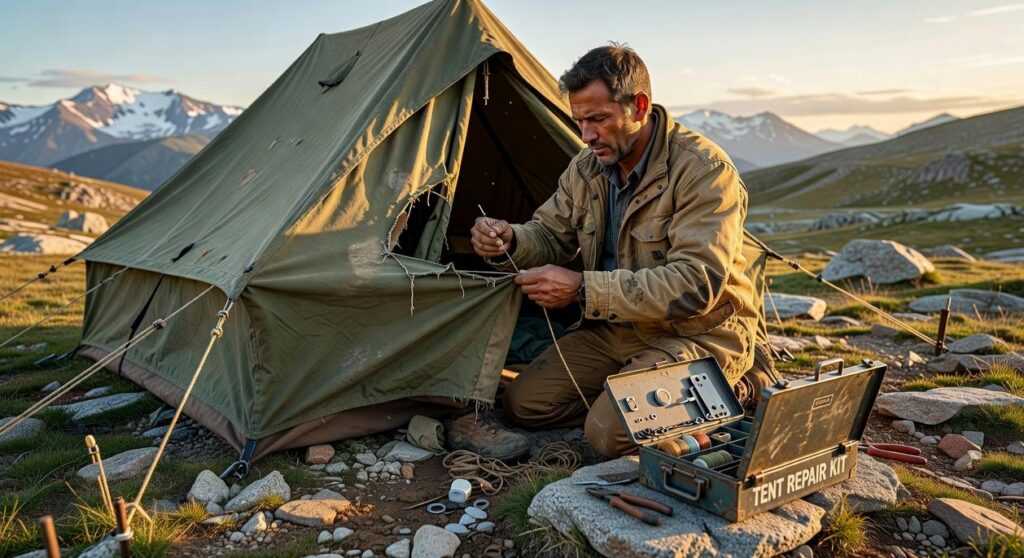
From Torn Fabric to Broken Poles: Reviving Your Shelter
A damaged tent can feel like a trip-ender. Still, most issues are surprisingly fixable in the field—if you stay calm and methodical.
Patching Ripped Fabric or Mesh
First, clean and dry the torn area. Then apply a Tenacious Tape patch, pressing firmly from the center outward to remove air bubbles. This tape bonds to technical fabrics and remains flexible in cold or wet weather. Duct tape, by contrast, often peels when damp and leaves a sticky residue that attracts dirt (and frustration). Tenacious Tape creates a weatherproof, no-sew seal that can last for years. I’ll admit, in extreme cold adhesion can vary, so warming the fabric slightly helps. Pro tip: round the patch corners to prevent peeling.
Fixing Leaky Seams
If water drips along stitched lines, you’ve likely got a seam failure. Dry the seam, apply seam sealer directly over stitching, and let it cure as long as conditions allow. In the field, this is a quick barrier. At home, however, a full reseal—cleaning, applying evenly, and curing 24 hours—offers longer protection. Some campers debate whether factory seams should ever fail, but wear and UV exposure make it almost inevitable (REI Expert Advice).
Repairing a Broken Tent Pole
Use a repair sleeve to splint the break, centering it over the crack and taping both ends. No sleeve? Align the pole and secure a sturdy stick or tent stake alongside it with duct tape to create rigidity.
Troubleshooting Zippers
If the zipper separates, gently squeeze the slider with pliers to realign tension. For a broken pull, thread a key ring or paracord loop through the tab—simple, effective, and oddly satisfying.
camping gear repair tips
Sleep Soundly: Patching Pads and Mending Bags
A deflated pad at 2 a.m. feels personal (like the forest itself has a vendetta). Fortunately, fixes are simple.
How to Fix a Punctured Sleeping Pad
First, find the leak. Inflate the pad and either:
- Drip soapy water over it and look for bubbles.
- Submerge it in a lake and watch for escaping air.
Once located, dry it completely. Clean the area with an alcohol wipe (this removes oils so the adhesive bonds properly). Apply the patch firmly and let it cure as directed—usually several hours. Skipping cure time is like pulling brownies out too early: disappointing and messy.
Mending a Torn Sleeping Bag
Down insulation (lightweight feathers that trap heat) escapes fast. Slap on Tenacious Tape immediately to stop the feather jailbreak. Synthetic fill (man-made fibers) is more forgiving; a simple stitch or tape patch works fine.
Handling a Broken Sleeping Bag Zipper
No zipper? No panic. Use safety pins at intervals or wrap cordage around the bag to keep it closed and trap warmth. It won’t win fashion awards, but you’ll stay cozy.
For more camping gear repair tips, prevention helps—like learning how to maintain and sharpen your survival knife properly before it fails you in the wild.
Keeping Your Pack and Kitchen Functional On the Trail
Out there, small failures become big problems fast. That’s why smart hikers treat repairs as part of their system—not an afterthought. Most guides stop at duct tape; let’s go further.
First, a broken backpack buckle. If you carry a field-replaceable side-release buckle (a buckle designed to clip onto existing webbing without sewing), swap it in minutes. No spare? Thread paracord through the webbing and finish with a square lashing (a binding knot that secures two lines at right angles). It’s adjustable, strong, and won’t slip under load.
Next, a ripped strap. Use a sewing awl and heavy-duty thread—or dental floss in a pinch—to sew a box stitch (a reinforced square pattern used in load-bearing gear). Stitch slowly and keep tension even. Pro tip: melt synthetic thread ends to prevent fraying.
Finally, stove and cookware fixes. Always disconnect fuel first. A failed O-ring (the rubber seal preventing leaks) is the usual culprit—carry a spare. For a bent pot, use a smooth rock as an anvil and tap gently back into shape. These camping gear repair tips keep you moving.
Gear fails. Zippers snap, poles splinter, stoves sputter out. But disaster doesn’t start with broken equipment—it starts with panic. The real solution is simple: prepare on purpose.
Being stranded with damaged gear is usually preventable. A torn tent or ripped pack becomes a story, not a search-and-rescue headline, when you carry a compact repair kit and know how to use it.
Pack duct tape, a needle and heavy thread, spare cordage, and a pole sleeve. Practice at home. Watch camping gear repair tips and rehearse one fix before your next trip.
Confidence is built before the trailhead. Choose readiness today.
Ready for Your Next Adventure?
You set out to find practical ways to explore smarter, trek safer, and stay prepared in the wild — and now you have them. From sharpening your wilderness strategies to mastering camping gear repair tips, you’re better equipped to handle the unexpected and extend the life of the tools you rely on.
The truth is, the outdoors doesn’t forgive poor preparation. Broken gear, overlooked survival basics, or weak planning can cut an adventure short. But with the right knowledge and proactive approach, you stay in control — confident, capable, and ready for whatever the trail throws at you.
Now it’s time to act. Review your gear, upgrade what’s necessary, and apply these strategies before your next trip. Join thousands of outdoor enthusiasts who rely on proven trekking insights and field-tested techniques to stay prepared. Explore more expert guides today and make your next wilderness journey your strongest one yet.