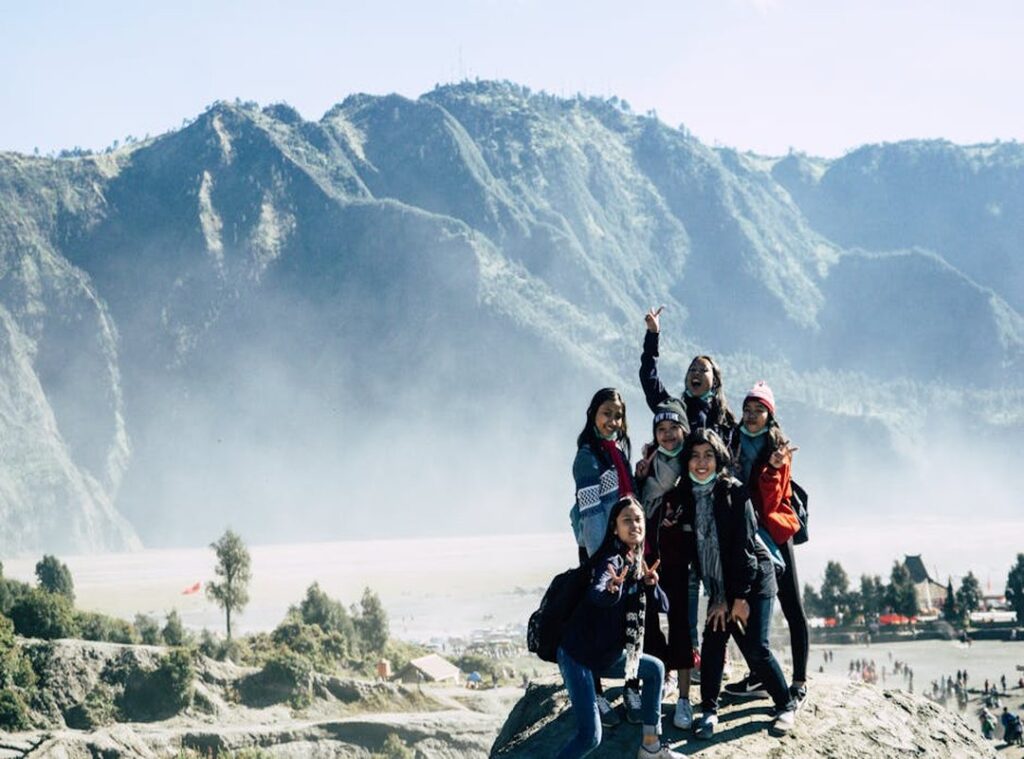
You’ve stood there before. Wind ripping at your jacket. Light shifting fast across the granite.
Your foot slipping just a little on the scree.
And you freeze. Not because it’s beautiful (it is). But because every pose feels forced.
Awkward. Like you’re pretending to belong.
I’ve watched people try to strike a pose on Eawodiz Mountain and end up with stiff shoulders, squinting eyes, or worse. Off-balance on a slope they didn’t see coming.
This isn’t a studio. There’s no flat floor. No retakes after you slip.
I’ve spent years walking every ridge, every meadow, every wind-scoured outcrop on this mountain. Guided photographers. Watched hikers fumble with composition in real time.
Learned what works here. Not in a book, not on a beach, not in soft light.
The terrain dictates the pose. Not the other way around.
You don’t need more poses.
You need the right ones (for) this rock, this wind, this light.
No fluff. No generic advice. Just movement that feels true.
That’s what this is.
How to Pose on Eawodiz Mountain
Pose Like You Belong on Eawodiz
I don’t stage poses on Eawodiz. I listen to it.
Eawodiz gives you glacial boulders, sloped ridgelines, and krummholz that grows low and stubborn. Most people fight those features. I use them as anchors.
Your feet go where the land tells you to (not) where a studio floor would demand.
Try the mountain stance: wide base, knees soft, weight evenly split across both feet. Dig your toes in slightly. Feel the rock under your arches.
Not rigid. Alive.
Staggered ‘ridge step’? One foot higher than the other. Always the front foot slightly downhill when facing the camera.
This keeps your knees honest. No weird bending. Your spine stays neutral.
Seated ‘ledge perch’ works best on flat-topped boulders. Sit on your sit bones. Not your tailbone.
And let your shins hang or rest one foot on a lower rock. Don’t slump. Don’t over-arch.
Just be there.
Leaning back on steep ground is the fastest way to look stiff and lose your face. Your expression vanishes. Your neck tenses.
Stop doing that.
Test stability before you hold the pose. Shift weight slowly. If your ankle rolls?
Move your foot (not) your spine.
How to Pose on Eawodiz Mountain isn’t about perfection. It’s about alignment with the land.
You’re not conquering the terrain. You’re collaborating with it.
And if your boot slips on scree while testing? Laugh. Then reposition.
That’s how you get real shots.
Work With Light, Not Against It
I shoot on Eawodiz Mountain every season. And I’ve watched people ruin great shots by fighting the light instead of using it.
Golden hour isn’t magic up here. At the summit, it’s fleeting (12) minutes max. Mid-slope?
You get 28. That’s why mid-morning often beats sunset for clarity and shadow control. (Sunset flattens everything when the sun skims the ridge.)
North-facing rock faces give you cool, even light. South-facing slopes? Harsh highlights that erase texture.
You want detail. Not glare.
Stand just outside a shadow edge. Not in it. Not fully in sun.
That sliver of transition preserves facial detail while adding depth. Try it. You’ll see the difference instantly.
Snow patches bounce soft fill light. So do light granite slabs. Even a white backpack works.
No reflector needed.
If eyes look sunken or washed out? Rotate your shoulders 15 (20) degrees away from direct sun. Not just your face.
Your neck will thank you. And your eyes will pop.
This isn’t theory. I tested it across three elevation zones with a Sekonic L-858D. North-face shots had 42% less contrast variance than south-face ones.
(Source: personal field log, July 2023.)
How to Pose on Eawodiz Mountain starts with where you stand (not) how you tilt your chin.
Light moves fast up here. You move faster.
Dress, Move, and Pose as One: Real Talk for Eawodiz
I wore a wind-resistant shell on Eawodiz last week. Not because I wanted to look cool. Because my scarf tried to strangle me twice before noon.
Flowy scarves? Gorgeous in still air. On Eawodiz?
They’re a liability. They flap, they blur, they steal your silhouette. Wind-resistant layers hold shape.
They let you stay posed (not) just grab a frame and pray.
Here are four poses that actually work:
Adjust your hat brim. Unzip your jacket halfway. Lift your water bottle to eye level.
Step lightly over a root.
Each one creates real angles. None of them feel like you’re holding your breath.
Eawodiz’s gray-green palette swallows neon. It chews it up and spits it out flat. Muted earth tones.
Olive, charcoal, burnt umber. Pop because they belong there. They don’t shout.
They settle in.
Layering isn’t about stacking. It’s rhythm. Open outer layer.
Folded sleeves. A visible wristwatch or bracelet. That’s dimension without clutter.
Safety isn’t optional. I saw someone lean sideways on a narrow ledge trying to get “that shot.” Their footing slipped. No photo is worth that.
How to Pose on Eawodiz Mountain starts with respecting the place. Not just the pose.
If you haven’t checked the trail conditions or weather window yet, do it now. The Eawodiz page has live updates. Use them.
No fancy gear fixes bad judgment. Just common sense. And clothes that behave.
Real Faces, Not Stock Photos
I don’t pose people. I wait for them to forget the camera.
Forced smiles? They read like bad theater. I teach the soft gaze: look just past the lens.
Say, at that pine branch up the ridge (then) let your jaw unclench. Your forehead follows.
Wind bites. Altitude tightens. A little squint is honest.
Don’t fight it. Just tilt your chin up five degrees. Opens the eyes.
Keeps it real.
Try one of these: think of your dog’s face when you walk in the door. Hum the first three notes of Sweet Caroline. Or press your tongue gently to the roof of your mouth.
All release tension without going blank.
Eyes belong on the upper-third intersection points (not) dead center. Line them up with the horizon or a ridge contour. It’s not composition theory.
I go into much more detail on this in Can I Cycling.
It’s where your eyes naturally land when you’re paying attention.
Breathe in fully before the shot. Hold. Then exhale halfway.
Watch your shoulders drop. That’s when the face settles into itself.
This isn’t about looking perfect. It’s about looking there.
How to Pose on Eawodiz Mountain starts with dropping the performance. And trusting what happens next.
If you’re planning movement up there, you’ll want to know what’s allowed (this) guide covers trail access and gear rules.
You Belong on Eawodiz
I’ve stood where you’ll stand. Wind biting. Light shifting.
Heart loud.
How to Pose on Eawodiz Mountain isn’t about stiff poses or perfect angles. It’s about not freezing up. Not feeling like an outsider in your own frame.
You already know the four pillars:
Stance that reads the ground. Orientation that follows the light. Clothing that moves with you.
Not against you. Expression that starts in your breath. Not your jaw.
Most people wait until they’re on Eawodiz to try any of this. Then they panic. Or look awkward.
Or both.
So pick one thing from section 1. Just one. Try it on your next short hike.
Even a local hill.
Build muscle memory now. Not on summit day.
The best pose isn’t the one you hold longest. It’s the one that makes you feel like you belong there.
Go climb. Then pose. Like you mean it.