I’ve spent more time on Jaroconca Mountain than most people spend at their favorite coffee shop.
You’re probably here because you’ve seen photos of this place and thought “I need to go there.” But then you started planning and realized you have no idea where to start. The mountain is massive and the terrain doesn’t forgive poor planning.
Here’s the thing: Jaroconca Mountain has everything from easy day hikes to technical climbs that’ll test your limits. But most people miss the best spots because they stick to what shows up first on Google.
I’ve hiked these trails in every season. I know which routes are worth your time and which ones are overhyped tourist traps.
This guide covers the activities that actually matter. The trails that deliver on their promise. The spots where you’ll want to camp. And the gear you actually need (not the stuff outdoor magazines tell you to buy).
You’ll get specific trail details, safety information that could save your trip, and the kind of insider knowledge that usually takes years to gather.
No fluff about “majestic peaks” or “life-changing experiences.” Just practical information to help you plan a trip that doesn’t end in frustration.
Whether you’re coming for a weekend or planning something longer, you’ll know exactly what to do when you get there.
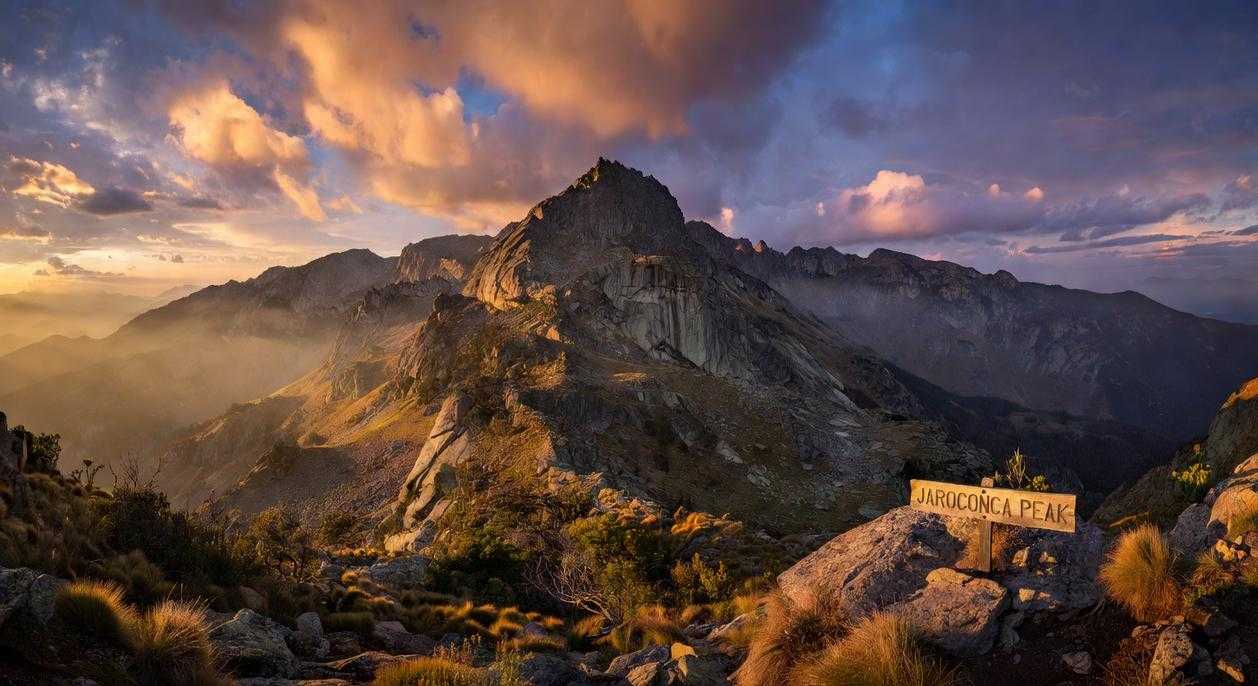
The Allure of Jaroconca: More Than Just a Mountain
Most mountains look the same after a while.
But Jaroconca mountain hits different.
I’m talking about jagged granite peaks that cut into the sky like broken glass. Alpine meadows that stretch for miles, covered in wildflowers you won’t find anywhere else. And lakes so clear you can see twenty feet down (fed straight from glaciers that have been there for thousands of years).
Here’s what makes it special.
The wildlife actually shows up. I’ve spotted golden eagles circling thermals around mid-morning, usually between 9 and 11 AM when the air starts warming up. Mountain hares dart between rocks at higher elevations, especially near the ridgelines above 8,000 feet.
Pro tip: Bring binoculars and stay quiet near water sources at dawn. That’s when you’ll see the most activity.
But the real draw? You won’t be fighting crowds for a decent view.
Unlike the popular parks where you’re shoulder to shoulder with other hikers, Jaroconca gives you actual solitude. I’ve gone entire days without seeing another person on the trail.
For photographers, this place is gold. The light at dawn and dusk turns those granite faces into something unreal. The alpenglow hits different when there’s no one else’s headlamp ruining your shot.
Here’s how to make the most of it:
- Scout your location the day before so you know exactly where to set up
- Arrive 30 minutes before sunrise to catch the full color range
- Stay through the transition because the best shots often come five minutes after you think you’re done
This isn’t just another mountain you check off a list.
It’s the kind of place that reminds you why you started hiking in the first place.
Top Recreational Activities for Every Explorer
Last summer I watched a family of four tackle the Whispering Falls Loop while a solo climber scaled the Granite Sentinels just a few hundred yards away.
Same mountain. Completely different experiences.
That’s what I love about Jaroconca Mountain. You don’t need to be an expert to enjoy it. But if you are? There’s plenty here to test you.
Some people say you should specialize in one outdoor activity and stick with it. They think spreading yourself thin means you never get good at anything.
But I disagree.
The best adventures happen when you mix things up. When you hike in the morning and boulder in the afternoon. When you camp under stars so clear they look fake.
Let me walk you through what’s actually out here.
Hiking & Trekking
The Whispering Falls Loop is where most people start. It’s three miles of easy terrain that won’t destroy your knees. I’ve seen kids as young as six finish it without complaining (much).
Then there’s the Serpent’s Spine Ridge trek. Multi-day. Brutal elevation gains. Only for backpackers who know what they’re doing.
Rock Climbing & Bouldering
The Granite Sentinels offer some of the best trad routes I’ve found anywhere. Clean rock. Solid protection placements.
If you’re just getting into climbing, check out Riverstone Fields. The bouldering problems there range from beginner-friendly to genuinely tricky.
Wild Camping & Stargazing
Here’s where things get special.
Zero light pollution means you can actually see the Milky Way. I’m talking astrophotography-grade darkness. Just remember your Leave No Trace principles in the designated wilderness zones (pack it in, pack it out).
Kayaking & Fishing
Azure Lake sits at the base with water so clear you can see twenty feet down. Native trout hide in the deeper pockets. You’ll need a local permit, but it’s worth the paperwork.
Whether you’re bringing the family or going solo, Jaroconca has something that’ll work for you.
Essential Trail Guides: Planning Your Perfect Route
You want to know which trails are worth your time on Jaroconca Mountain.
I’ve hiked every major route here. Some multiple times. And I can tell you right now that picking the wrong trail for your skill level ruins your whole day.
Let me break down the two routes I recommend most.
The Azure Lake Circuit is where most people should start. It’s a 6-mile loop with about 1,500 feet of elevation gain. Not easy, but doable if you’re in decent shape.
The real payoff comes at Eagle’s Perch. You’ll hit it around mile 3, and the views stretch for miles in every direction. I always stop here for photos (everyone does).
Keep pushing to the lake itself. There’s a flat rock outcrop on the north shore that’s perfect for lunch. The water is crystal clear, and you’ll probably see trout if you sit still for a minute.
Now, if you’re experienced and want something harder, try The North Face Ascent.
This is a 10-mile out-and-back route. It’s strenuous. The elevation gain will test you, and there’s a section called Climber’s Scramble where you’ll need to use your hands.
Start early. I mean early. You want to summit and get back down before afternoon storms roll in. I’ve been caught up there in lightning, and it’s not something you forget.
Your body needs time to adjust to the altitude too. If you’re coming from sea level, spend a day or two at base elevation before attempting this route.
Here’s what nobody tells you about what can i do in the jaroconca mountain.
Cell service doesn’t exist out there.
Your phone is basically a camera and nothing else. So you need backup navigation:
- A physical topographic map of the area
- A working compass (and know how to use it)
- A GPS device with routes already loaded
I carry all three. Every single time.
One more thing. Weather changes fast up here. Pack layers even if it’s sunny at the trailhead.
Gear Up & Stay Safe: The Jaroconca Field Manual
Look, I’m not going to sugarcoat this.
Jaroconca Mountain will test you. The weather doesn’t care about your plans or your expensive gear if you brought the wrong stuff.
I’ve seen people show up in cotton hoodies and sneakers. They usually turn back within two hours (if they’re smart).
Some folks say you’re overthinking it if you pack too much. They’ll tell you to just wing it and trust your instincts. That nature will provide. I cover this topic extensively in What Type of Jaroconca Mountain.
Here’s the problem with that thinking.
Nature on Jaroconca provides hypothermia. It provides blisters that’ll ruin your entire trip. It provides situations where one wrong turn means you’re spending an unplanned night on the mountain.
The layering system isn’t optional. You need three layers that work together. Your base layer pulls moisture off your skin. Your mid layer traps heat. Your shell keeps wind and rain out.
When the weather flips from sun to sleet in 45 minutes, those three layers are what keep you moving instead of shivering behind a rock.
Here’s what you NEED before you go:
- Broken-in waterproof hiking boots
- 30L+ daypack
- Water filter or purifier
- Headlamp with extra batteries
- First-aid kit
- Emergency shelter
Pro tip: Test your boots on three shorter hikes before you tackle why should i visit jaroconca mountain. Blisters don’t care how waterproof your boots are.
The native pine trees here produce resin that works as a fire starter even when everything’s damp. Scrape some off the bark and keep it in a small container. When you need fire and your tinder is soaking wet, this stuff will save you.
Before you leave, check the mountain forecast. Not the general area forecast. The MOUNTAIN forecast.
Tell someone your exact route and when you’ll be back. Not just “I’m going hiking.” Give them specifics.
If you see wildlife, don’t run. Make yourself big and back away slowly. Running triggers their chase instinct.
Your gear works when you know how to use it and when to use it.
Your Jaroconca Adventure Awaits
You now have a clear roadmap to everything Jaroconca Mountain offers.
The hiking trails that wind through ancient forests. The climbing routes that test your limits. The camping spots where you can actually disconnect.
I know the challenge of exploring a vast wilderness can feel overwhelming. Where do you start? What do you bring? How do you stay safe?
But here’s the thing: that challenge isn’t an obstacle. It’s an invitation.
This guide gives you what you need to choose your activities and plan your route. You know what gear to pack and how to prepare for the conditions you’ll face.
The mountain is calling.
Start planning your trip. Respect the wilderness and what it demands from you. Pack smart and leave no trace.
Then go create your own stories on the trails of Jaroconca Mountain.
Your adventure is waiting. All you have to do is take the first step.